DIY Dried Fruit
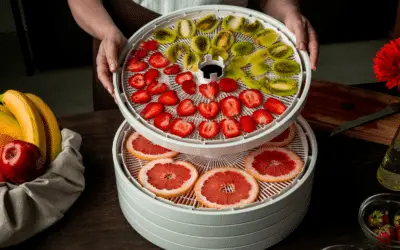
Dried fruits are healthy and delicious snacks. Learn how to make your own dried fruits with just an oven, no dehydrator machine needed! Included in this article is a fruity quinoa recipe, so read on to find out more.
The procedure of drying your own fruits
1. Prepare your selected fruits
Choose the fruit that you want. It should be ripe but not overly so. Select those that are without blemishes and marks. Some examples of the fruits you could choose are berries, cherries, pears, apricots, peaches, and bananas.
Wash and peel the fruit. For fruits like cherries, apricots, and blueberries, they are better off uncut and dried as a whole piece. Do remember to remove the seeds or pits of the fruits.
Slice the fruits according to the thickness that you want. Try to slice them into equal thickness, so that they can dry equally well.
2. Dry the fruits using an oven
Now that you have sliced your fruits, it is now time to dry them! You should only dry one type of fruit at a time, as different fruits may need different drying times and temperatures. Place the fruits evenly onto a non-stick baking tray that is lined with baking paper. Ensure that the fruits do not touch each other.
Heat the oven between 54 and 71 degrees. Depending on the thickness of your fruit, you should adjust the temperatures accordingly. For example, a whole and thick fruit like apricot should be dried at a higher end of the temperature range while thinly sliced fruits should be dried at the lower end of the temperature range.
Bake the fruits for some time between four and eight hours. Keep the oven door slightly opened and flip the fruits every 30 minutes. To ensure that all the fruits are equally dried, rotate the tray every two hours. The fruits are dried when they are harder, but still chewy and bendable.
3. Store your dried fruits
When your fruits are ready, take them out of the oven and let them dry for minimally twelve hours. This is to let moisture evaporate from the fruit. Thereafter, you may store them in airtight containers for up to 10 months.

Fruity Quinoa Salad
Now that you have made your own dried fruits, add them into your quinoa salad bowl! This gives your greens some colour and makes them much more appetizing to eat. The crunchiness of the leafy greens together with the chewiness of the dried fruits is a win-win combination. The quinoa salad bowl is a good meal option, as quinoas are extremely nutritious, containing all nine amino acids, fiber, and antioxidants. Quinoas also contain two types of flavonoids that have anti-inflammatory and anti-depressant effects. Let us get started on a health journey now!
Time: 35 minutes
This recipe serves 6 to 8.
What you need:
For the salad
- ¼ cup of diced walnuts
- ¼ cup of slightly toasted pistachios
- ¼ cup of slightly toasted and diced almonds
- 2 teaspoons of lemon zest
- 1 cup of rinsed rainbow/red quinoa
- Salt
- 4 cups of water
- 2/3 cup of diced dried fruits
- ¼ cup of diced fresh mint
- ¼ cup of diced cilantro
- ½ cup of diced fresh parsley
For the dressing
- 1 teaspoon of pomegranate molasses or maple syrup
- ¼ cup of fresh lemon juice
- 1/3 cup of extra virgin olive oil
- 1 small pureed garlic clove
- ¼ teaspoon of ground cinnamon
Steps:
- Boil water in a 18cm saucepan and add in quinoa as well as salt to taste. After the water is boiled fully with erupting bubbles, lower the heat slightly and boil gently for 20 minutes. Boil it until you see a tail sprouting out (the endosperm) as that is a sign that your quinoa is cooked. Drain the water out of the quinoa by using a sieve and add the quinoa into a pot.
- Cover the pot with a tea towel and place the lid on top of the towel, to let it rest for 10 to 15 minutes. Thereafter, pour the quinoa into a large bowl.
- Whisk the pomegranate molasses, cinnamon, lemon juice, salt and garlic together. Then whisk in the olive oil.
- Add in the wet elements in step 3, the dressing and the remaining ingredients into the large bowl of quinoa and toss together. There, your fruity quinoa salad is ready.
Conclusion
We hope that you will enjoy trying out these recipes. If you do not have time at home to dry your own fruits, we recommend our dried fruits selection for a more convenient option. They are also packed in airtight resealable bags so freshness is guaranteed!


